OSはVolimio2を使用。
用意するもの
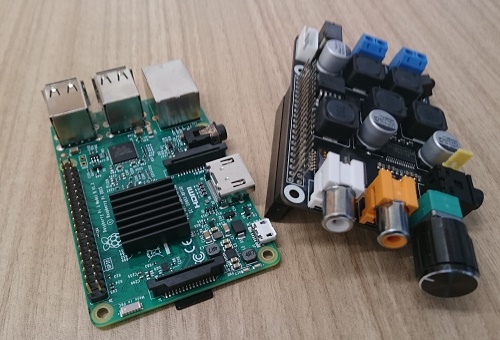
Raspberry pi3
Suptronics X400
SDXCカード (64GBを使用)
余り物を流用する場合には、フォーマットしておく。
SDカードフォーマッターが便利。
ACアダプター(X400用)
バッファローのルーター用のアダプタ(12V、2A)を流用した。
Volumioの書き込み、起動
Volumioをダウンロード、解凍する。
Win32 Disk Imager で、SDカードにイメージを書き込む。
Raspberry piに差し込み、LANケーブルをつなぎ、電源を入れる。
接続
有線接続
LANケーブルを接続、同じネット上にあるPCのブラウザから、
http://volumio.local
に接続。
あるいは、volumioのIPアドレスを入力し、接続する。
Windowsのコマンドブロンプトよりpingを打ち、接続確認やipアドレスも確認することもできる。
>ping volumio
無線LANしかない場合
接続したいけど、アクセスポイントの検索やパスワードの入力ができないし。(´・ω・`)
でも、大丈夫。(`・ω・´)
Volumioは自動的にHotspotになる。
スマホや無線LANのあるPCよりアクセスポイントを検索。
Volumio Documentation: Quick start guide
Volumio Hotspot
If your device has wireless capabilities (and a supported Wireless card) Volumio will create a Wireless Network called Volumio, the default password is volumio2
Once in Hotspot Mode, Volumio can be reached with IP 192.168.211.1 or via http://volumio.local as usual
接続後に
Show Settings #右上の歯車(スマホだと右下)
NETWORK
Wireless Network
アクセスポイントが表示される。
自分のアクセスポイントを選択、パスワードを入力すると接続できる。
任務を終了したHotspotは自動的に消滅する。
ssh接続
login as: volumio
password: volumio
IPアドレスの固定
Show Settings
NETWORK
Wired Network
Automatic IP:onからOFFにする。
固定したいアドレスを入力、saveする。
曲を入れる
同じネットワーク上のPCのエクスプローラーより、下記入力。
\\volumioのIPアドレス
「Internal Storage 」に、曲をコピーする。
曲は下記に収納される。
/mnt/INTERNAL/
Browse
Music Library で見えるはず・・・。
見えない。
その時には、
Show Settings #右上の歯車
MY MUSIC
My Music
Update
これで、見えるようになる。
Suptronics X400の接続
電源を切り、X400を接続。
くれぐれも、microUSBに電力を接続しないように。
WARNING: DO NOT APPLY POWER TO YOUR RASPBERRY PI VIA THE PI’s MICRO USB SOCKET.
Recommended Power Adapter : 110~240VAC input, 18 ~ 22VDC 4A output
電源端子のサイズ
Show Settings
Playback Options
Audio Output
Output Device: IQuadlO Pi+DigiAMP+
125DAC: On
DCA Model: IQuadlO Pi+DigiAMP+
Saveしてreboot
]]>